Do you want learn how to improve accuracy drawing?
Struggling with proportions?
When you’re a drawing beginner, your skill can improve exponentially. Jumping leaps and bounds, exploring new techniques and experimenting. However, as time goes on, with more drawing practice under your belt, your drawing improvement can slow. Even worse, your drawing skill could even decline with bad habits forming.
This is certainly not what you want. Bad habits with drawing forms over time, affecting your overall drawing game. One great way to combat this is by improving your accuracy and proportions. So I’m here to help you progress your drawing skill once again.
Within this blog post you will discover how to improve the accuracy and proportions of your drawings. I’m sharing my decade long experience of drawing to help you improve this vital skill. With practical tips throughout, mini-tutorials to sound advice along the way. It’s certainly helped my own drawing skill, as you can see in the progress from 2013 to 2022.
Drawing is the foundation towards rock solid artistic skills. Whether you’re a painter, illustrator to even a graphic designer, drawing can help you in numerous ways. So with that said, let’s get started with my first tip.

Start with basic forms
Instead of starting a drawing by focusing on the details, you need to work from shapes or basic forms. After you’ve sketched your lay-in, you can work towards the details. Most drawing beginners start a drawing by working on the integrate details first. Paying all of their attention to the right eye in a portrait illustration, without looking at the bigger picture (quite literally). However, this often results in inaccurate proportions and accuracy. Basic forms consists of:
- Squares or cube
- Triangles or cone
- Circles or cylinder
Build your drawing from these shapes first. To give you an example, if you’re drawing a shoe, then begin by splitting the drawing into a series of shapes as listed above. Once these are in place, you can then use further shapes to construct the other details (like shoelaces for examples).
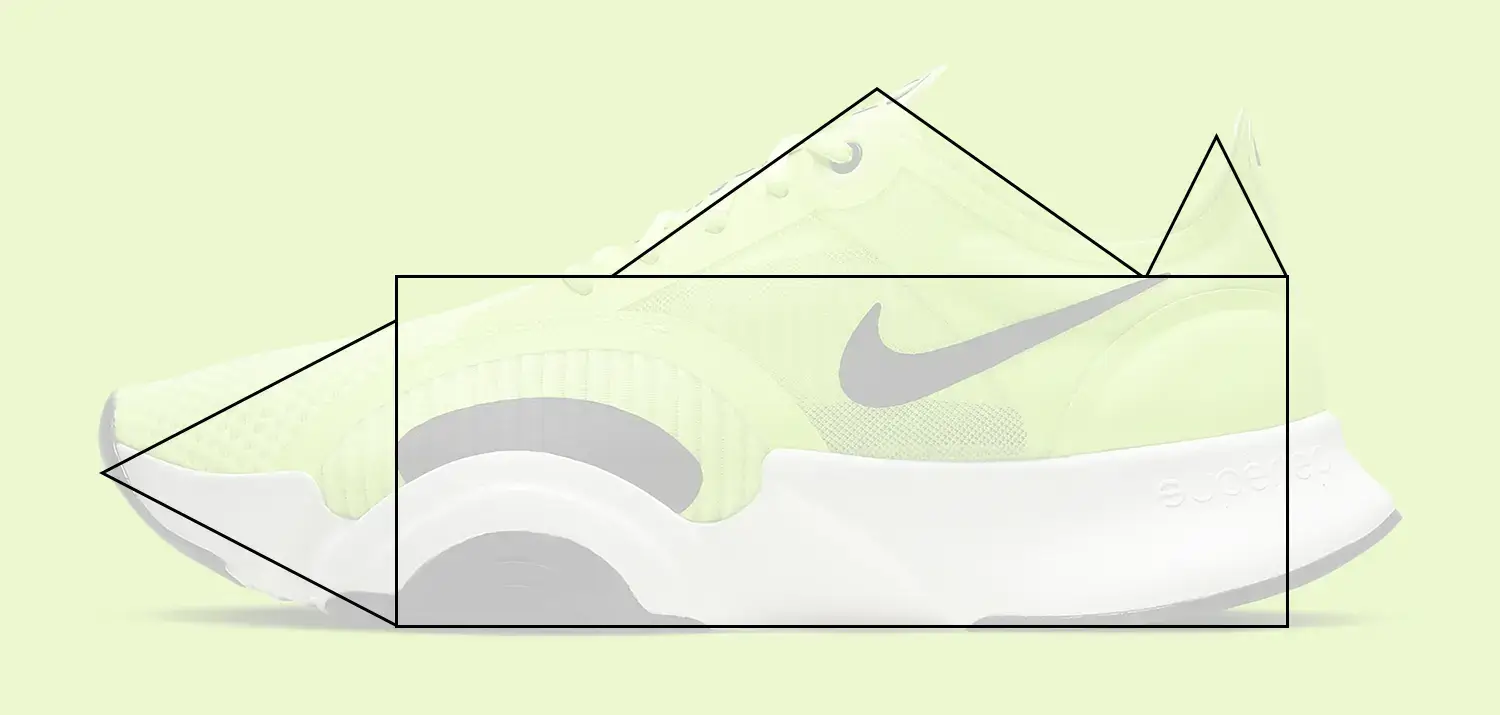

Once your happy with the proportions and accuracy of the drawing, you can then add shading, tonal values to colour. You can see in one of my Youtube clip, that I’m building up the drawing with basic shapes first, before working towards the finer details.
Tip one: Start with the building blocks and create a foundation of your drawing using basic forms first, then concentrate on the details.
Draw upside down
When I’m referencing a photograph or an artistic master artwork, rotating my drawing so it’s upside down improves my accuracy. It uses the right side of my brain, which is said to focus more on images rather than words, and is the ‘creative side of the brain’. Flipping your drawing highlights errors, and because your brain can’t interpret the subject (because it’s the wrong way up), it sees the image for what it is.
This tip derives from the brilliant book, ‘Drawing on the Right Side of the Brain’ by Betty Edwards:
“The method includes the notion of upside-down drawing—the idea that when learning to draw by copying, it is preferable to turn the to-be-drawn object upside-down. The effect of a 180-degree rotation is to silence the left brain’s preconceptions about what the drawn object looks like and allow the right brain’s perceptual processing and creativity to take over.”
Psychology Today
The book sets an exercise to copy a Picasso drawing, however upside down. Even if you’re a complete beginner, it often ends with a highly accurate result. This revelation excited me when I completed the exercise. Try it for yourself by selecting an image and draw it the wrong way up.

Whenever I get stuck with a drawing, I actively do this so I can see errors, before flipping it back to normal. This approach is similar to putting your drawing up to mirror. This will actively help you learn how to improve drawing accuracy.
Tip two: Temporarily draw an image the wrong way round to see your mistakes. Or view your drawing against a mirror, the results will surprise you!
Establish grids lines
When you’re drawing, use horizontal and vertical grids to help you. This is ideal when drawing from a reference photograph, however you can also do this when drawing a real life scene with a viewfinder.
Drag your reference image into a photo-editing software (like Adobe Photoshop for example), and place vertical and horizonal grids across the image. You can then further split the image by dividing the image again by half.
For this to work, it’s very important that your artboard is the same ratio as your sketchbook page or artboard. For example, if your drawing is 10cm x 10cm, then the image should be 10cm x 10cm too, or a similar ratio (in this case it’s a 1:1 ratio). This ensures that the photograph that you split with grids correlates to your drawing, and vice versa.
This helps your drawing as you can map your drawing in relation to these lines. Some of your drawing may be incorrect, however other parts of your drawing could be close to the reference image. You can then go in and change your drawing accordingly.
Tip three: Split your drawing and reference image into a grid to help you map out your mistakes and see which areas you need to change.
Analyse, track and monitor
If you’re a professional tennis player, you would likely analyse all parts of your game. You would have coaches to improve on your game, you would analyse your movements with the latest technology, and you would track your weight. Taking advantage of every integrate detail. Rather than this only applying to sports starts, you can achieve the same level of professionalism in your drawing and artistic pursuits.
“Take a simple idea and take it seriously”
Charlie Munger
You could analyse your drawings, hire a drawing tutor, or track how your drawings are progressing over time. Remember, you can’t manage what you don’t measure. Don’t leave this to the professionals in other walks of life, but achieve the same level of success with your drawing. You can create a learning schedule, which I use to ensure I’m always on track and improving.
Tip four: Analyse your drawing process and record this within a spreadsheet. Think of it as your drawing journal, looking at your improvements over time. I’ve recently published a YouTube video on how to analyse your drawings, if you’re more of a visual learner.
Use imaginary lines
This is similar to tip three within this how to improve drawing accuracy guide, however use this tip when you’re drawing from observation in particular.
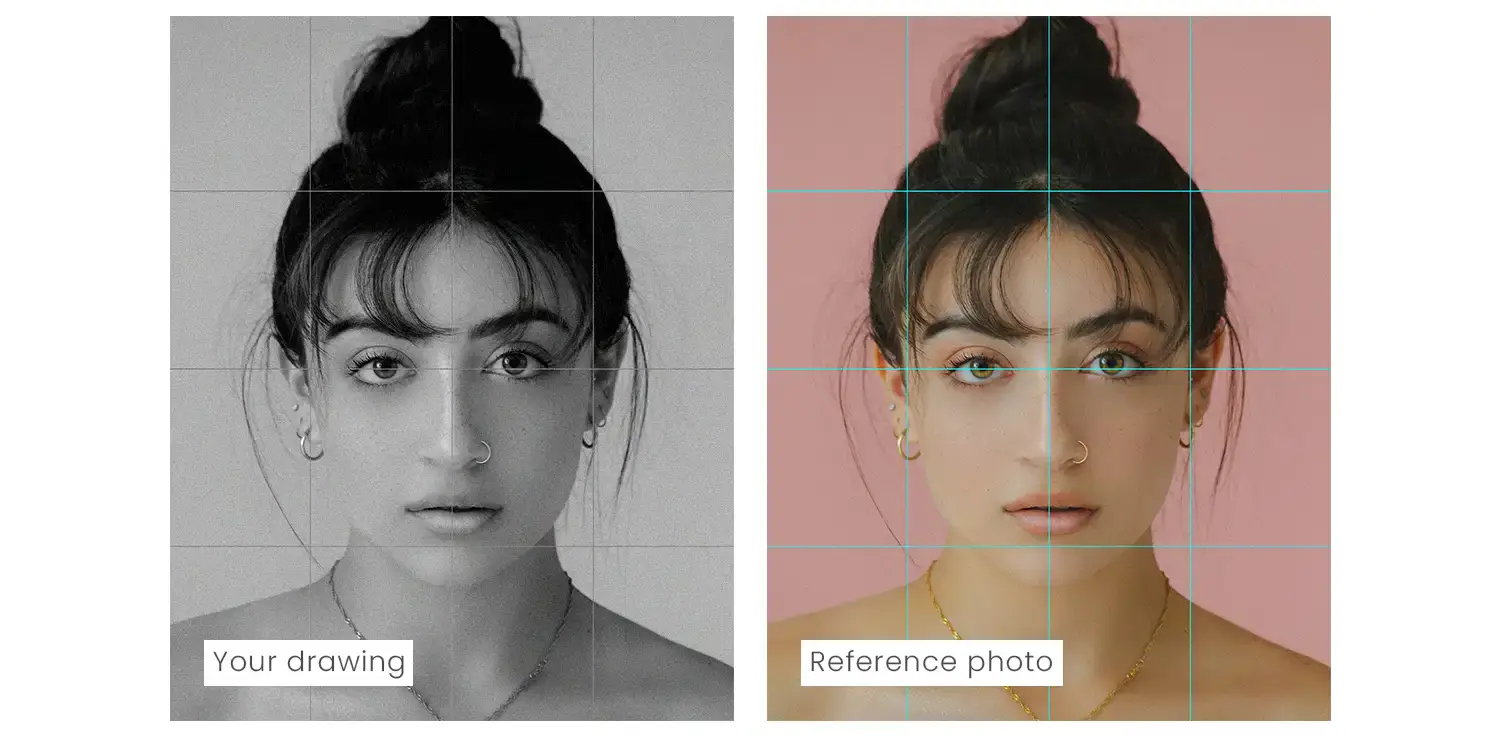
When drawing, use imaginary horizontal and vertical lines in your head to see how certain elements in your drawing relate to one another. Taking this drawing below with it’s cross referencing photograph, you can build your drawing by using these lines.
When you’re learning how to draw a head, how does the ear relate to the nose? How long is the chin to nose in contrast to top of eyebrows to nose? Or, how does the edge of the neck relate to eyes?
You can achieve this by placing these lines in your head, relating one element to another.
Tip five: Use imaginary grid lines in your head, and work out proportions against these lines.
Deliberate practice
Practicing will always improve skills, right? Practising is all well and good, however if you aren’t deliberately practicing then your drawing skill can stagnant. But what does deliberate practise mean?
“Deliberate practice refers to a special type of practice that is purposeful and systematic. While regular practice might include mindless repetitions, deliberate practice requires focused attention and is conducted with the specific goal of improving performance.”
James Clear
Deliberate practice has focus, goals and gives you an ideal of how you are performing. Mindless practice is too leisurely. It’s like going to the gym, if you aimlessly exercise on a few machines and lift a bit of this and bit of that, then you’ll end up disappointed by your improvement. You have no clear goal in mind. Even worse, your body adapts if you were to repeat the same lift with the same weight week after week. You stagnant and eventually stop going to the gym.
I can certainly vouch for this. For years I would think that if I simply practice drawing, then this would be enough. However, over time, I become too comfortable. I had no goal in mind, and was too aimless in approach. I now push my boundaries and have goals in mind with deliberate practice, improving my overall artistic skill.
Tip six: Avoid aimless practice and start a deliberate practice regime. Step out of your comfort zone and practice those weaknesses. Over time, your confidence will improve, and as a by-product, your drawing accurary will too.
In conclusion
I hope you’ve enjoyed today’s article about how to improve drawing accuracy and proportions. I utilise all of these tips, that has vastly improved my own drawing skill.
As we’ve covered a lot of in this article, lets go over what we have discussed.
How to improve drawing accuracy
- Start with the basic forms: sketch loosely to begin with, concentrating on those basic forms before committing to the details (work larger to smaller).
- Flip your image: Draw upside down to notice the errors of your drawing.
- Split into horizontal and vertical grids: If you’re drawing from a reference photograph, split your drawing and reference image into grids.
- Analyse, track, and monitor: You can’t manage what you don’t measure. See how your drawing progress is adding up to secure those big gains!
- Use imaginary lines: See how certain elements relate to one another in your head by constantly analysing your drawing.
- Step out of your comfort zone: It’s all about deliberate practice, so scrutinise your progress to really evolve your drawing skill.
- Have fun: If you’re not having fun, then you won’t make drawing a consistent habit. Relish your drawing!
If you liked today’s blog post, see my other blog post on tertiary colours, and how it can improve your colour theory. Or check out my article all about creating your illustrator portfolio. Great for beginners or professionals who want to know the latest techniques.
Many thanks for listening and visiting my blog today. You can follow what I’m up to on my Twitter, Facebook, or Instagram pages, I’ll really appreciate it if you do, and don’t be afraid to say hi to me! Many thanks again, and have a great day!

 17th March 2023
