Do you want to learn how to draw the head?
Struggling to draw portraits or faces?
Drawing the head is one of the most difficult things to draw for beginners. They say it’s just as difficult as drawing the figure, the feet, or hands.
You should have seen my portrait drawings when I was a beginner! Features would be in the wrong place, the eyes would be too high, and there wouldn’t be a complete skull.
Drawing portraits is one of the key aspects that makes up the majority of art. When you go to an art gallery, you often see figures (and yes, most of these figures have faces).
The ability to draw faces correctly is noticeable when you go to these art galleries. For example, Rembrandt’s portraits are legendary. His work wouldn’t have the same impact if his portraits were poor within his figurative work.
Why You Should Learn How To Draw The Face
You see portraits in figurative work, illustration, through to sculpture. It’s an aspect of drawing that most artists want to perfect. You may not be a portrait or figurative artist, and you may not think it’s an important skill to learn.
But how cool would it be if you perfected drawing heads?
As another example, if you’re a landscape concept artist, even though landscapes are your number 1 priority, you can take your landscapes to another level by 1. placing figures in your work, and 2. making the faces / portraits that you draw within these environments kick ass! You can then draw figures and faces into your work with ease.
The difficult thing with drawing heads and portraits is that one small error in recording the face can result in a big change, and look like a different person altogether.
We’ve all been there, and you may be feeling these frustrations right now.
But help is at hand, I’m sharing easy steps to help you draw the head from the front. I’ll be covering the basics, how forms make up the head, and where exactly you should be placing the features whilst drawing a portrait. I’ll also be drawing over a photograph within this article, giving you a step by step process of how to construct the head.
I’m taking all of this content from my Youtube video. So if you prefer to learn from a video, go to this link! (Do Like, comment and subscribe if you like the video – thanks!).
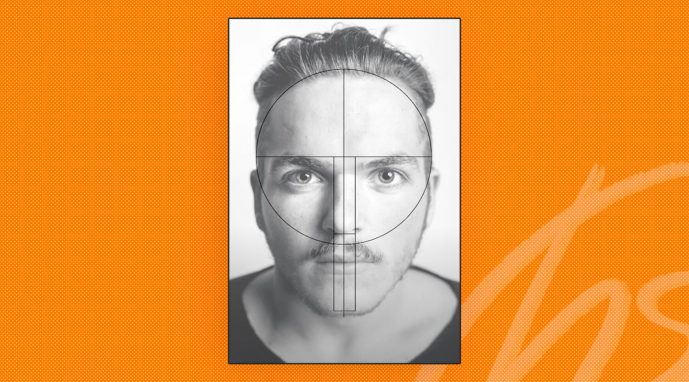
Step 1 – Circle & Centre Lines
Start your head drawing with a circle. This circle corresponds to the cranium of the head. The top part of the circle (or cranium) sits roughly at the bottom of the hairline, and the bottom of the circle sits roughly at the bottom of the nose (indicated below).
Once you’ve got your circle in place, draw a vertical line down the circle. This line beyond the circle should be roughly half the height of the circle.
This is your centre line, which corresponds to where the nose, the middle of the eyes, and the centre of the mouth sits. As you can see in the image below, this line depends on where the head is facing. This takes a bit of getting used to, so bare with it.

Following this, draw a line horizontally along the centre of the circle. This is what’s called the brow line, or where the eyebrows sit. After completing these 2 lines and circle, you’ve worked out the positioning of the head in relation to where the head is looking.
Pro tip – ghost your lines before drawing on the paper. Ghosting is easy and offers fantastic results. In a nutshell, ghosting is when you mimic drawing just above the paper (without actually making a mark), before committing to the mark itself. For example, if you’re drawing a circle – you would ghost the action of drawing a circle about 2-3cms from the drawing paper, before drawing on the paper itself. This results in more confident and clearer lines.
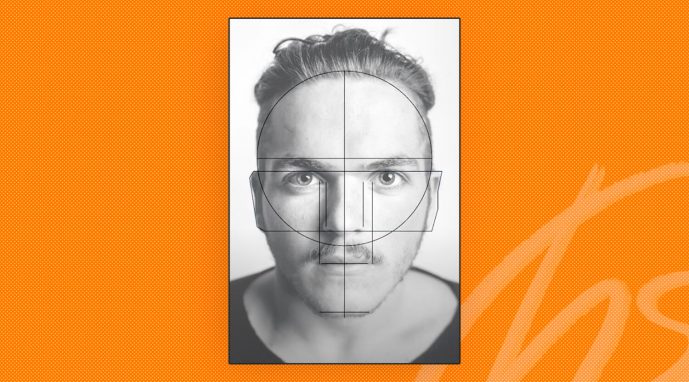
Step 2 – Positioning Of The Chin
To work out the distance of brow to nose, this is usually half the distance between the brow line, and the chin.
Some individuals have big and small noses, so this might be greater / smaller for certain individuals, but this is the general rule of thumb.
As you can see below, roughly work out the position of the nose with a horizontal line, and then use this measurement to work out where the chin sits.
Step 3 – Mouth & Eyes
Next up is the mouth. Draw a horizontal line where the mouth sits – this is usually a little bit wider than the nose. The corners of the eyes line up with the sides of the mouth – so you can either place vertical lines up the face to work out the positioning of the eyes, or ghost this with your pen / pencil in the air.
The eyes are usually one eye width apart from one another too. The eyes sit in a socket underneath the brow line.

Pro tip – A good idea is to draw on top of a photograph, much like I did with my video here. This allows you to see hows these steps relate in a real life example. You can then use this knowledge to improve your own head drawings.
Step 4 – The Ears
The top of the ears sit just above the eye line, and just below the brow line.
The bottom of the ears are inline with the bottom of the nose.
Step 5 – Hairline and Chin
These two elements depends on the individual, as the hairline depends on how much hair the person has (could be bald for example), and someone’s chin varies from person to person.
In most cases, the hairline hits the top of the circle from step 1. With the chin, this depends on the chin type and gender. Generally, females have smaller, more curved chins, and males have broader chins.

Step 6 – Planes of The Face
Different planes make up the face. If you’re wondering what the heck a ‘plane’ is – a plane is when a form turns in space, and how the sides of a shape relate to one another in space too.
If you imagine a 3D box, or if you have a look around your environment right now and pick out any ‘box like’ objects, the different planes represent different sides of that box.
As the box turns upwards and side to side, different planes will be shown to the viewer. Planes in art are more complex than this (which includes perspective), but if you understand the essence of how planes work, it will help your portrait drawing.
If you have a look at the drawing below, do you see the different planes of the face? There’s three planes on the forehead, there’s 3 planes of the nose (one either side and one on top), and the overall head (with cheekbones), have 3 planes. Other planes include the mouth and nose.
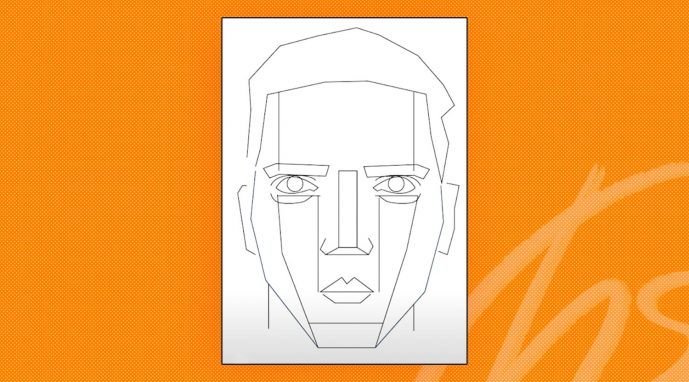
When a face turns (horizontally and vertically) in relation to the viewer, the planes turn as well. For example, if a face looks up, the plane of the forehead is shorter than when looking down.
It’s not essential to know everything about planes to draw a head, but it will definitely help improve your understanding of how to draw a portrait. This resource will improve your drawings in general.
Step 7 – Facial Details
Coming to the end of the tutorial now, the last parts are usually the most satisfying.
We can now start to record the facial details. Draw the mouth, eyes, nose by how you see it in the face. Remember that all facial features are 3D, and are never flat on the face.
This is important as when a lot of drawing beginners in particular draw the eyes, they draw them flat. Don’t make this mistake and remember eyes are curved around the plane of the face.
If you always think in 3D when drawing, it will make your 2D drawing seem 3D (and more realistic).
Everyone has different facial features – some short noses, some larger mouths, some people have eyes which are slightly wider apart. But as you have 1-6 steps under your belt, this part is a lot easier to handle.
Drawing beginners try to start a portrait drawing with this step first, which is a common and huge mistake. It’s always best to lay the foundations before adding detail on top.
Once you’ve correctly recorded the facial features, add tones, and you’re good to go! You should be left with a finished portrait drawing. Nice work!
How To Draw The Head – What Have You Learnt?
Within this article you have learnt how to draw a head from the front view. You can follow these steps to draw the head with confidence. Talking of confidence, the more you do of anything the more confidence you have (generally).
I suggest you firstly look at photographs of heads, and see how these steps correlate to the photographs.
Look at how the ears relate to the eyes, how the nose relates to the chin, and how the width of the eyes are inline with the corners of the eyes. The more of an understanding you have about the head, the better your head drawings will be.
To simply put it – draw a circle for the cranium, draw the vertical and horizontal lines, see how the eyes, ears, hairline and jaw relate to one another, draw the planes, facial features, and then you’re done (I told you I’ll say it simply enough hehe).
If you want some more help with how to draw the head, I’ve published a super helpful video on the subject over on YouTube. Otherwise, build a consistent drawing habit with these tips. This is my dedicated channel for drawing portraits, so do check that out if you haven’t already – any Likes and subscribes would be more than grateful!
Check out my other resources on this blog to help you with freelancing, drawing, and art!
Be sure to add your comments below, I’ll love to hear how you got on with your own portrait drawings.
Many thanks for listening and visiting my news page today. You can follow what I’m up to on my Twitter, Facebook, or Instagram pages, I’ll really appreciate it if you do, and don’t be afraid to say hi to me! Many thanks again, and have a great day!
 4th June 2022
