Ever wonder why some artists seem to improve overnight while others struggle for years?
In this article, I’m revealing 10 essential tips that will transform your drawing skill faster than you ever thought possible.
If you want to see real progress and turn your sketches into masterpieces, stick around—because these tips might just change the way you draw forever.
Whether you’re a beginner or looking to refine your skills, these actionable tips will help you build a strong foundation and take your art to the next level.
If you prefer to watch instead of read, take a look at the video below comment with your thoughts and questions, Like and subscribe to The Portrait Guru!
So let’s get into it!
1.Practice Basic Shapes Then Basic Forms
This might seem easy, but it yields big results!
Begin by practicing basic shapes like circles, squares, and triangles. These are fundamental, and are the building blocks for more complex drawings.
For example, if you’re drawing a figure, you can start with basic shapes to capture the essence of the body before moving onto the details.
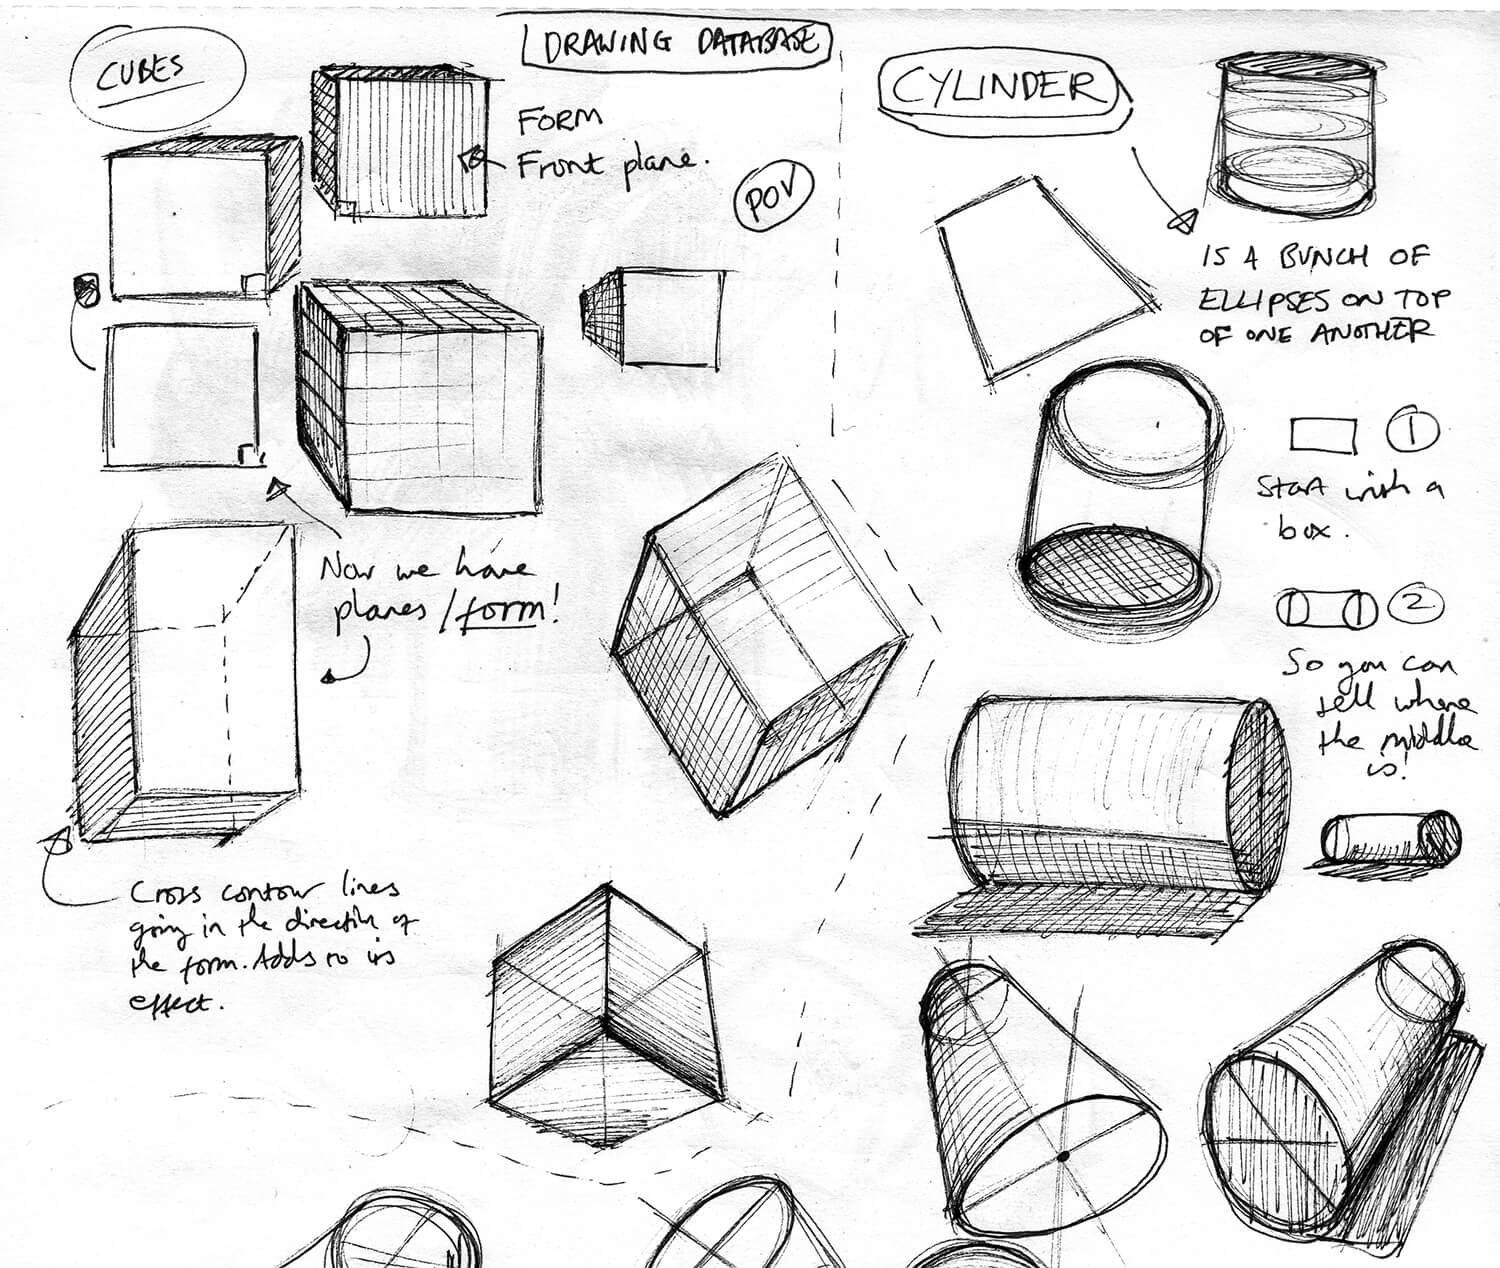
Once you’re comfortable with these basic shapes and have practiced them enough, move onto transforming these shapes into 3D forms such as cubes, spheres, and cylinders. This will help you understand perspective and volume, which are crucial for creating realistic drawings.
To elevate your learning, draw cross contour lines around these shapes.
Cross contour is a technique where you draw lines across the surface of an object following its form, and it can help you better understand the object’s three-dimensional structure and improve your ability to depict volume and depth in your drawings.
It can also make your drawings seem more three-dimensional – a double win!
Draw these basic forms in different angles with different perspectives, and experiment with what you can come up with.
I recommend you practice this for 1 – 3 times a week, for at least 5 – 10 minutes.
2. Focus on Observation Rather Than Photos
Now you have basic shapes and forms mastered, use these skills for observational drawings.
Drawing from life is one of the best ways to improve.
It’s far better than drawing from photographs. Whether it’s a still life, figure drawing, or drawing the landscape, this exercise forces you to draw what you see, rather than what you think you see.
Pay attention to light, shadow, and proportions.

This practice helps enhance your accuracy and depth.
I recommend an easy still life to start with, like an apple, cereal box or mobile phone, before moving onto an object which is more complex, like a teddy bear, house plant or your cat. Draw everything and everyone around you to see the greatest improvements.
If you only commit to one exercise from this entire article, I highly recommend you focus on this or basic shapes and forms.
I recommend you practice this for 3 – 4 times a week, for at least 15 minutes.
3. Practice Gesture Drawing
Gesture drawing involves quickly sketching the movement and posture of a subject.
When I was new to life figure drawing, I didn’t think much of the 1 minute poses. I didn’t see how it could help me improve my drawing. I would rush my drawings during these poses, and not think about accuracy.
However, I learnt that these short poses requires expressiveness and gesture, focusing on the movement of a pose but still being accurate.
This practice helps you capture the flow and energy of an object or figure, and improves your ability to draw dynamic poses. I recommend you spend 5 minutes on this one, practicing loose sketches to get better at capturing the essence of movement.
It’s a great warm up as well, so maybe combine this with another, longer exercise. Try 30 seconds, 1 minute, to 5 minutes of timed drawing.
4. Learn 1, 2 and 3 Point Perspective
Another really important aspect of drawing is perspective. If you can fully understand perspective, this will dramatically improve your drawings.
Like observational drawing exercises, you’ll see the biggest improvements in your art by learning perspective.
Start with a simple one-point perspective drawing. Draw a horizontal line, which represents the eye line, place a dot on this line, and draw lines from this dot.
Draw different perspective angled boxes from these lines and experiment.

Once you have a good grasp of one-point perspective, gradually explore two- and three-point perspective. 2 point perspective includes 2 dots on the eye line, and 3 dots for 3 point perspective.
Practice drawing objects in perspective to improve your compositions, drawings and figures.
Drawing boxes in perspective is one of the best, easiest and most beneficial ways to practice.
If you really want to see big improvements in your art, I recommend practicing this exercise for 15-30 minutes, 3-4 times a week.
5. Master Shading and Light
Shading adds dimension to your drawings and brings them to life.
Start by building up tones with different shading techniques, like cross-hatching, stippling, and blending to create various textures and effects.
Draw 5 boxes in a row, and shade them in dark to light order, and try and draw something just using these tones.
Pay attention to how light and shadow interact with your subject to enhance realism. The most important shading basics are:
Core Shadow: The darkest part of the shadow on an object, located on the side that is furthest from the light source. It’s where the light is least able to reach, giving the object a sense of volume.

Cast Shadow: The shadow that an object casts onto a surface or another object. It’s created when the object blocks light, and it’s shape depends on the light source’s angle and the object’s form.

The Terminator: The line or area where the light transitions into shadow on the surface of an object. It marks the boundary between the illuminated side and the shadowed side, often where the core shadow begins. This is often the darkest part of a shadow.
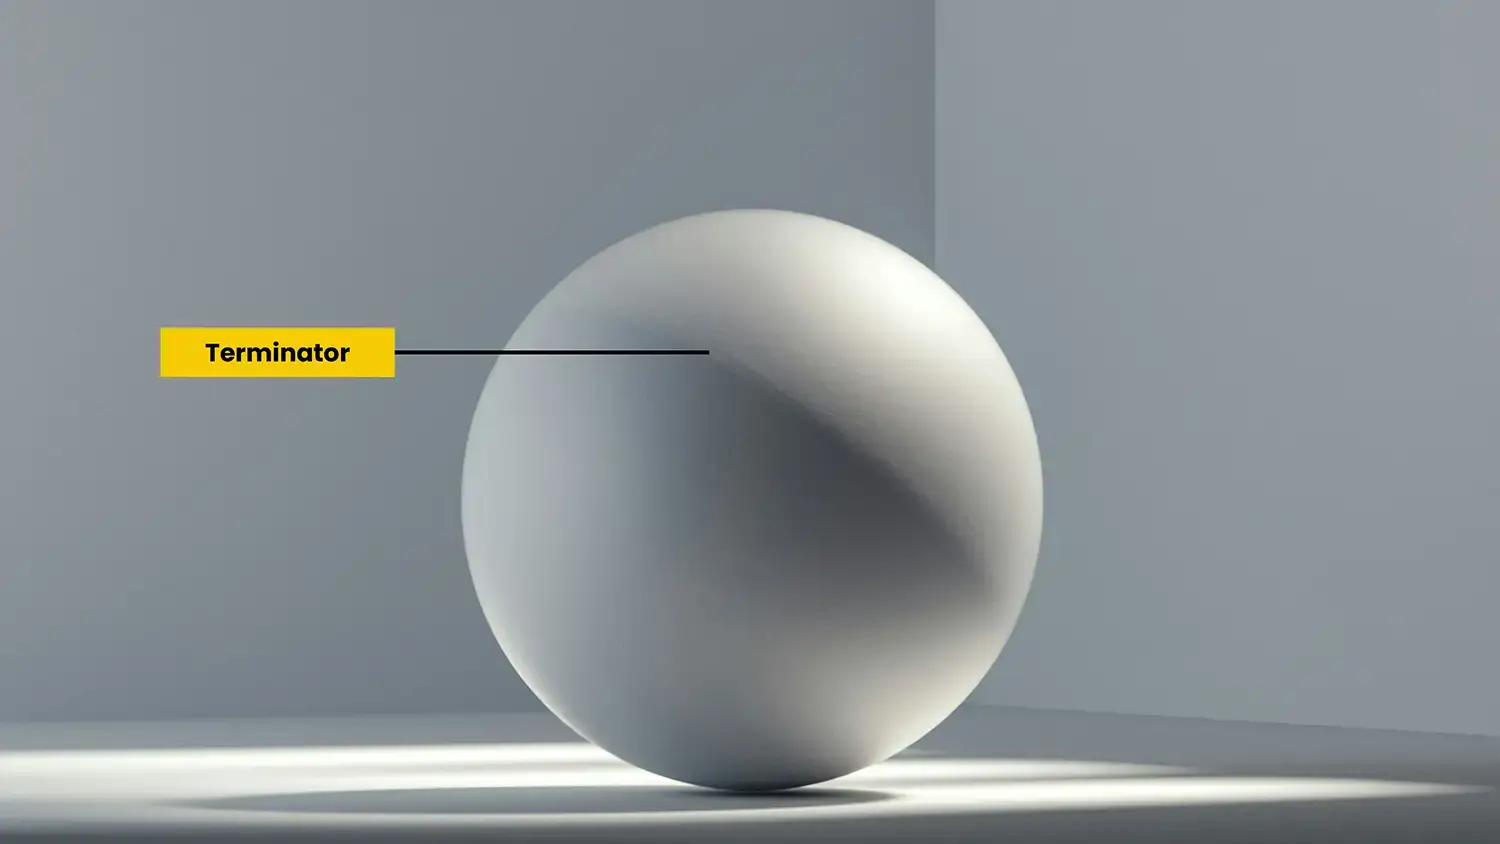
Reflected Light: Light that bounces off nearby surfaces and slightly illuminates the shadowed side of an object. It softens the shadow and adds subtle detail, preventing the shadowed areas from appearing flat or overly dark. It also makes for more three dimensional and realistic drawings.

Combine this when drawing from observation. If you’re drawing an apple for example, look at the shadows and light that is cast on that object.
I recommend building your tones, studying shadow and light for 10-15 minutes, 1-2 times a week.
6. Develop Line Quality and Control
The quality of your lines can greatly impact your drawing.
A classic beginner mistake is to make all of your line thickness, weight and pressure all the same. This results in one dimensional drawings and often looks ‘comic like’. Practice varying your line thickness and smoothness to create different lines.
Controlling your lines with precision will add expressiveness and detail to your work.
I recommend ghosting your lines, and practicing this exercise regularly to help you create better quality of lines.
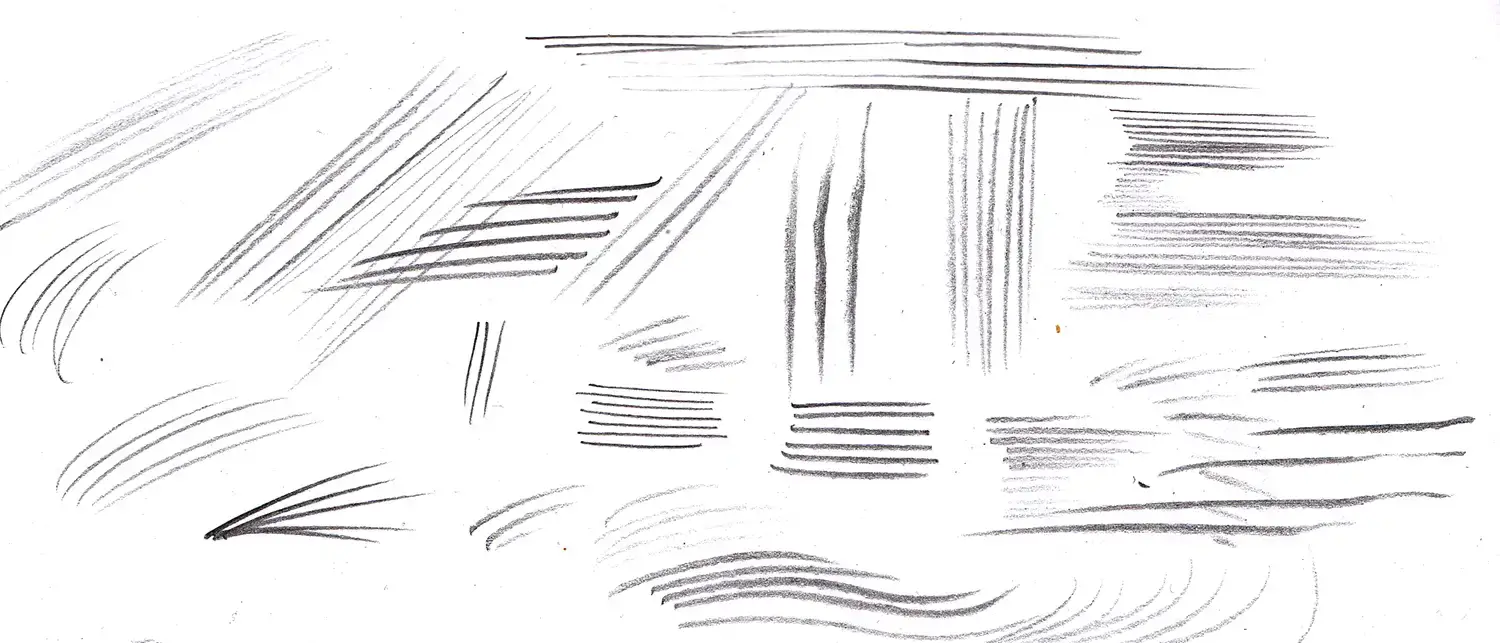
Draw dots on your page and practice drawing lines in-between these lines. Follow through with your lines, and be confident with your marks. Don’t just draw straight lines either, and practice semi-circles, swirls to irregular lines.
Progress your line quality and control by taking what you’ve learnt into your more finished drawings, like the observational exercise.
I recommend practicing this exercise for 5 minutes, 1-2 times a week.
7. Commit To Master Studies
I love creating master studies! It’s a powerful tool at your disposal to improve your drawing skill, develop your personal style and see how the pros created their art.
Take time to study the work of artists you absolutely love. This is really important as you’ll be more engaged whilst studying, commit to your master studies, and enjoy the process even more.
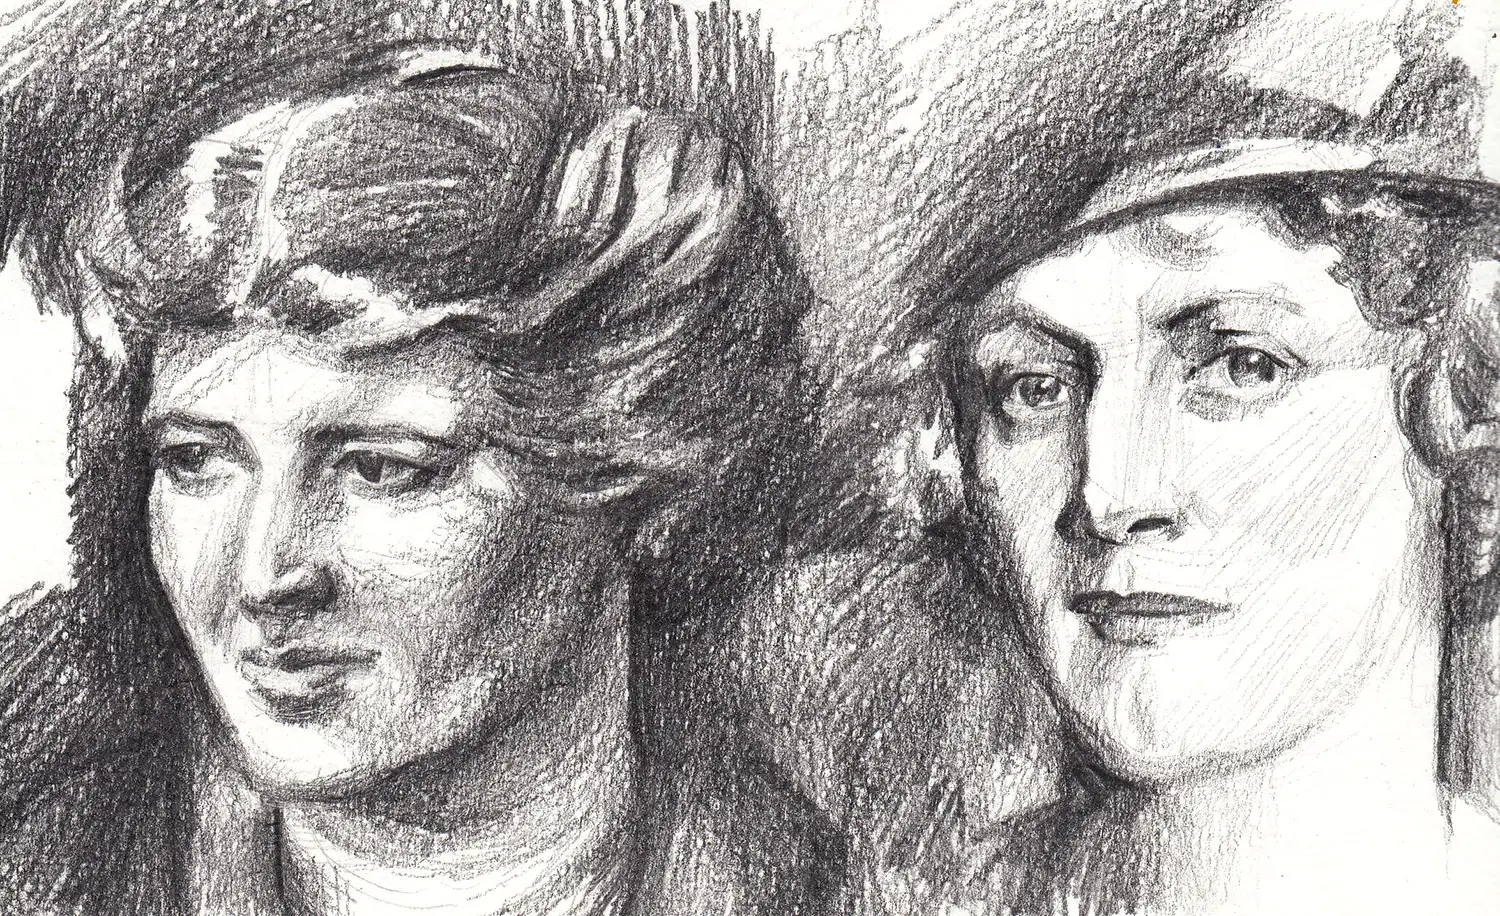
Pick one aspect or theme that you love about each artist, and really hone in on that one thing. This is far better than just merely copying your favourite artists work.
This is strategic and deliberate. Maybe it’s Rembrandts portrait creations, Monet’s colour to Sargents painting technique.
Analyse their techniques, compositions, and use of colour or line. Understanding their methods can inspire new approaches and help you discover your unique style.
If you want more help with your master studies, take a look at this one in the top right corner. I recommend doing this exercise for 30 – 1 hour, 1-2 times a week.
8. Practice Regularly
Consistency is crucial for improvement.
If you’re a morning person or a night owl, set aside time each day or week to draw. This is your time to draw, so make sure it’s distraction free! Build a drawing habit, and try and not break that streak you have going.
Regular practice helps you build skills, experiment with techniques, and refines your style.
Even short, daily sessions can make a big difference over time.
You’ll see the greatest improvements by being consistent with your drawing. I recommend drawing everyday 😉
9. Attend Life Drawing Sessions
Figures often play an important role in most artworks. Look at some famous artworks and more often than not, a figure is included.
To help you draw people, proportions and also anatomy, one great way to achieve this is by attending life drawing sessions.
This can be untutored or tutored sessions, and can be very cost effective.
One great resource is meetup.com, where you can easily search local groups in your area.
This is a type of observational drawing, and can catapult your drawing skill. So I really do recommend you attending once a week to see epic improvements. If not, every fortnight would also do great things for your drawing skill.
10. Seek Constructive Feedback
And then finally, share your work with others to gain different perspectives.
Constructive criticism from friends, peers, or online communities can provide valuable insights and help you identify areas for improvement.
Embrace feedback as a tool for growth, as it can highlight strengths you might overlook and weaknesses you can work on. If you’re a self-taught artist, consider reaching out to tutors, professionals, and taking courses.
Consider things like:
- Online Art Communities: Platforms like DeviantArt, ArtStation, or Reddit offers spaces where you can share your work and receive constructive criticism from fellow artists of all levels.
- Social Media Groups: Join art-focused groups on Facebook or participate in art challenges on Instagram where you can connect with other artists and get feedback in the comments or direct messages.
- Local Art Classes or Workshops: Enroll in a local drawing class or workshop where you can get in-person feedback from instructors and peers, offering hands-on advice and live critiques.
I hope you enjoyed today’s article!
If you liked this article, check out this video on what to draw when you’re bored. Or check out how to improve your drawing accuracy and proportions.
Many thanks for listening and visiting my blog today. You can follow what I’m up to on my Twitter, Facebook, or Instagram pages, I’ll really appreciate it if you do, and don’t be afraid to say hi to me! Many thanks again, and have a great day!

 7th September 2024
